Tuesday, November 24, 2009

Red Sonja Costume

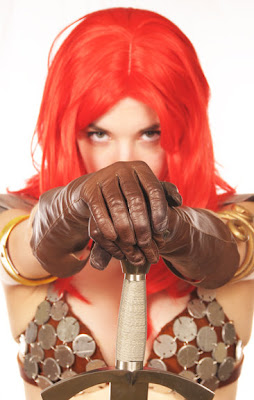
Red Sonja costume was Completed March 2008. The costume was designed by myself. I was helped during the costume process by my friend Nicola and my husband Greg.


Why I wanted to make it:

Red Sonja is probably one of my favorite characters of all time. Being a strong female character she pretty much portrays all the aspects of someone I would look up too.. I have always loved the disc-mail bikini and the bright red hair. What was really neat about the Red Sonja revival in 2005 is was many different comic book artists drew Red Sonja covers, so I was able to see how other people interpreted the costume. There are a few aspects from a couple artists that I liked an used those in my costume.

Work in Progress:

It all started with a trip to the lingerie store. Choosing the right bra and undies was crucial. I wanted to have a well made bra that would withhold the weight of the metal and leather plus have a little bit of push-up to give my chest the look of Red Sonja's (delusions of grandeur). This is the bra I went with. The undies, I just wanted them to be quite low so my torso looked very long... (I am only 5'2")... so I went with a string bikini style.

The leather (I went REAL LEATHER on this costume, yes it was more expensive, but I think it gave it just that extra rugged look) was a very subtle deerskin. I hand sewed the leather to the bra cups and underwear with a thick waxed thread. I used leather strapping for the bra straps and belt. Nicola showed me some leather tooling techniques for when we designed Sonja's shoulder armor. All leather was attached by rivets, sewing or snaps.

With the metal discs, my friend Nicola, at the time, was working at a welding shop. She was able to produce aluminum discs at varying sizes for me. I drew templates out for the bra cups and loin using three different disc sizes. My husband, Greg, helped immensely with drilling the holes (one-by-one) into the discs so I could link them together with rings (sorta like chainmail, but more simplistic). The disc-mail was sewn on or linked with rings to the leather.

I found the boots and gloves online, they were inexpensive, just had to search a little longer to find what I needed. I think the gloves were from ebay and the boots from an online shoe store. The arm bands were pretty simple, one is actually my Slave Leia arm band (made from electrical wire and then spray painted gold) the other is just two inexpensive gold bracelets from Claires Accessories and then riveted together.

The wig was also purchased online (ebay). I was pondering whether to go natural red-head or bright-red when I was first researching the character. I loved how she looked when artists drew her with the bright-red hair so I just went with that. I thought if it looked too cheezy I could just get a more natural-red wig, but I loved the all over look when I tried the bright-red wig with the rest of the costume. :)

The sword I got at a local eclectic shoppe.

Costume and Price Breakdown (estimates):

Fabric: I guess that would be the leather... deerskin, strapping and thick-grade leather, about $100, Bra - $40, Underwear - $8
Pattern: n/a
Wig: $40
Shoes: $36
Weapon Props: Sword - $100
Other Accessories: Aluminum Metal discs were no charge (thanks Nicola!), Aluminum wire $10, Bracelets for Arm - $12, Gloves - $16, Leather Tools - $30, Two Metal clasps - $4
Time to Build: Lots and lots of time, many, many hours.. over about 2 months. My weekend were consumed by metal and leather.. haha.

Enjoy the photos :)


Saturday, November 21, 2009

Long Time.... more costumes soon!

Hey Folks, Sorry about the long wait between posts. I am keeping a "hand-written" journal for my costumes and then writing them up on the blog. I am currently working on three costumes, that is probably why I haven't gotten anything up in awhile.

New costume line up for 2010 is.... Cortana (Halo 3 design-version), Snowbird (Alpha Flight comic book series - gotta represent Canada) and Selene (Underworld - First movie version).... and probably a few in-between.

I am currently writing in my journal about my Red Sonja costume and will post that up (hopefully) soon. I also want to get my Coraline costume post up soon to... I have had alot of people contact me about that one. And I get a great response from the photos I post up on Facebook... I think that was the easiest, cheapest costume I have ever made... plus most of the costume is useful for outdoor wear... hehe.

Friday, September 11, 2009

Justice League Unlimited Huntress Costume


The Justice League Unlimited Huntress costume was Completed June 2007. The costume was designed by myself and my friend Angela. The costume was sewn by Angela.

Why I wanted to make it:

After watching Justice League Unlimited and seeing how interesting and fun the Huntress character was I was really wanting to build the costume. I knew from the history of the character there were many versions of her costume. After researching and trying to decide which comic book version to do, I decided to just do the JLU cartoon version since that was my favorite portrayal of the Huntress character.


Work in Progress:

I started looking for some lycra dance fabric in black, white and purple. Angela recommended I should purchase a body suit with a high collar and then add the details and cape to it. I found a great dance supply store online and ordered the body suit, shorts and over-the-knee socks. I miraculously found some lycra fabric in the colours I needed, for the cape and purple detailing lines. Bodysuit Link

The belt was bought at a local clothing store and the belt boxes/pockets are actually ring boxes from Claire's Accessories, painted to match the purple. I found some purple eyelets to push into the boxes as "faux buttons". I attached two small elastics though the back of the boxes and then slid them onto the belt. The wig was purchased off ebay.

The mask for the costume was custom-made from a seller on ebay. Link I sent them my design as per the exact measurements to my face... sometimes its good to know how to use a design program that you can draw vector graphics in!

The boots where also found on ebay and the purple lycra stripes sewn to them. The boot's soles actually disintegrated at SDCC (2007) and I haven't replaced them yet... I just wear another pair of black boots I own instead (sans purple stripes). I also want to replace the over-the-knee socks with something better, they were a bit more thick than I thought when I ordered them and not as tight so they fall down a little bit. I think I know what I am going to do to fix it (I will post that when complete).

Since Angela sewed the costume I am not sure of all the techniques she used. She has a serger so she was able to make it easier than I would ever be able to do! The white trim on the whole costume is a 2" width on the cape and then the vertical strip on the body suit is the same.

Costume and Price Breakdown (estimates):

Fabric: About $40 worth of Lycra fabric... I bought extra purple so I could redo the boots and socks. The bodysuit, shorts and socks... about $60 with shipping.
Pattern: n/a
Wig: $40
Shoes: Booooo to these boots, they looked perfect, but fell apart, but they only cost me $30... need to be replaced!
Weapon Props: n/a (I know she uses a bowstaff and crossbow, but carrying stuff is sometimes a bother!)
Other Accessories: The leather mask was about $50. I also bought some crazy magenta-pinky lipstick like she has in the cartoon. It looked really bright! The belt was $20 and the ring boxes where about $10. Purple eyelets where $5 and paint $2.
Time to Build: Not sure how long it took Angela to sew everything together... I will ask her! The belt boxes (painting & attaching the elastic and eyelets) was about an hour or so. Sewing the lycra to the leather boots took a long time and then found out after I could have easily glued it... but that is for next time!

Enjoy the photos :)


Friday, September 4, 2009

Hello, and First Costume Blog


Welcome to my Costume Blog, where I will be describing in pretty good detail the process of how I make/design/sew/produce my costumes. And to let everyone know right now, I DO NOT make all my costumes by myself, though, I have made a few on my own. I have a lovely group of girlfriends that help me make my costumes when I unable to figure it out. Sometimes it's just out of my comfort zone or I don't have the right machine. Some pieces for costumes I have had commissioned or have traded work for work.

My first costume I am going to go over is, since Halloween is getting closer!!!:


Sally - Tim Burton's Nightmare Before Christmas
Completed March 2009


Why I wanted to make it:

This costume came from my love of this character. She is very sweet and innocent, but can show her stronger side by meeting adversity (or should I say Oogie Boogie) straight on. I always thought this would be a fun costume to design and make. Plus, I really wanted to make a Tim Burton character... and I have a few more in the to do pile. :)


Work in Progress:

I felt that I could pull everything together myself, the only daunting thing was the dress. As usual I wanted it to be spot on to the one in the movie, with the very subtle colours and designs (not the horrible easter-egg coloured Disney version you can buy at Halloween).

I started looking for fabrics that would match or reflect the colours and designs on the dress. But it soon became too time consuming and frustrating since I wanted it so exact. One evening I was doing research online and I came upon a seamstress that had designed a Sally dress to be pretty much exact to the movie! She designed the dress initially for children, but I found out she had made some adult sizes. So I emailed her for a quote and sent her my measurements and a few weeks later it was in my hands. The dress was exact, down to the muted colours, designs and embroidery, and it was all hand stitched together using black yarn!

The wig was another challenge. I decided to go with a yarn wig rather than a 'hair' wig because I wanted to portray Sally in her ragdoll form rather than just a 'human' version of Sally. I did a online search for a yarn wig tutorial (really easy and great pics for instructions) changed it a bit to reflect Sally's hair. I bought a nylon netted wig cap and attaching the yarn to that was very easy (time consuming, but easy). I bought dark red yarn from Michaels.

The shoes where my own. I bought them from Spring Shoes. And the socks where actually licensed "Tim Burton's Nightmare Before Christmas", I found them at Claire's Accessories last Halloween, I only had to fold them once so they were the correct length.

Costume and Price Breakdown (estimates):

Fabric: n/a - Commissioned dress from another seamstress - about $200
Pattern: n/a
Wig: Yarn (800 yrds)-$8, Nylon Wig Cap-$7
Shoes: My own... I think they were $50, plus the stripped socks... bought two pairs for good measure... about $20
Weapon Props: n/a
Other Accessories: I got red nail polish, red lip stick, black contacts, large fake eyelashes (kinda spaced like Sally's, and then white-blueish-green make up for my skin and blue eyeliner pencil for stitch marks.
Time to Build: The wig took a long time to make, probably around 5-6 hours, applying the make up took about 3 hours. I would like to thank my wonderful friend Rita Rogers for applying the makeup and drawing on the stitch marks (oh yes and Liann helped too!). Rita is a fantastic makeup artist. :)

Enjoy the photos :)